
This is a review of my newest work airbrush. If you want the short version… it’s great!
New Video: Building and Painting the Forge God from Kingdom Death: Monster
My newfound interest in creating new videos has continued and I’ve uploaded a new one. This time I’m painting the Forge God.
The video is essentially a walk through of the process more or less as it happens.. but with only a little actual video of the process. I go break down the strengths and weaknesses of the kit itself and how I approach dealing with the assembly and cleanup. Then I talk through the process of painting it. Which colors I’ve chosen, why and how I’m feeling about it.
New Video - Working with Dirty Down Rust
It’s been a while since I did videos regularly. I think I had gotten too ambitious with my process and complicated things to the point that I didn’t want to spend the time doing them at all anymore. With that in mind I decided to try doing videos on my phone instead of a dedicated video camera. Turns out this was a great idea for me. The quality is good (not GREAT but good) and it strips back the process to the bare minimum making it more likely for me to want to do it. I also changed my video editing software (went from Vegas to KDENLive). Everything is so much easier now!
Anyway, with that in mind here’s my latest video. Just a quick, 10 minute look at using Dirty Down Rust on a model. Nothing fancy. Enjoy.
Experimenting with Watercolors
Two videos in one week. That can only mean that I have a hole in my work schedule.
Actually, the act of simplifying my video creation process has made it easier for me to add new videos - and I have a hole in my work schedule.
In this video I talk about some experiments that I’ve been doing with watercolor paints. I’ve been using this set of Qor paints from Golden Acrylics. I think that these paints have a place in our toolbox but I’m still trying to figure out exactly where that place is. Check out the video and share your own thoughts in the comments.
Video Review - Brush Rinser from Green Stuff World
I’ve really wanted to get back into doing videos. Some of you have noticed that I’ve dropped back to doing almost nothing video related over the past couple of years.
One of the biggest issues I’ve had is that as I’ve tried to improve the quality of the videos the amount of time and effort they take to do has also increased - to the point where it was hard to justify doing videos (unpaid work) over using that time for commissions (paid work).
With that in my I decided that I was going to experiment with stripping it back to basics. This review was shot with my phone. Not even a new phone - a Pixel 3A (the Pixel 7 just came out BTW). Overall, I was not displeased with the results. the sound could be better and that may necessitate recording audio separately (which adds to the work involved) but otherwise? Not bad. Workable.
The inspiration for this has actually been watching Adam Savages videos on Tested.com. He’s been doing a lot of videos where he’s shooting on his own with nothing but a phone camera and the results have been surprisingly good. Not to mention that a lot of hobbyists are starting to shoot things for TikTok which has a pretty low barrier to entry as well.
It’s not that I don’t want to have good quality videos. I do. But I also want to actually DO videos and if I can make it so that I don’t feel like the act of creating videos is stealing too much time from making money they that’s the path I want to take.
Commission Availability for November/December
Now is a great time to contact me about new projects!
I have a lot of availability in my schedule for new projects and can turn things around quickly. Have you been thinking about gifting a painted miniature of three to somebody special? Well, now is absolutely the time to get in touch. I usually get most requests for this kind of thing in the middle of December and, as you might imagine, that’s really just too late. Get in touch now so we can have your gift ready before the date.
Scratch-Building an Old West building using a laser
This isn’t going to be a tutorial so much as some thoughts I’m jotting down a couple of days after completing my first large terrain project using my Aufero Laser 2 laser engraver. I hope that it will be helpful for those of you thinking about getting your own laser engraver for hobby projects. I am thinking about putting together a more comprehensive tutorial in the future.

My design work was done in LightBurn. Lightburn is one of the two most commonly used pieces of software offered for people with diode lasers (specifically those with GRBL-based controllers (not all do). Of the two, this one is the one that isn’t free. It’s also the one that is the easiest to use and comes with a complete set of design tools on top of just being able to control the laser. It’s well worth the $60 price tag.

I should probably mention that I didn’t design the building out of whole cloth. The building is based on an existing structure that is in Wyoming that was built in 1898. It’s a pretty standard design of what is essentially a box in back and facade up front. I picked this design specifically because I found a set of elevations for it on a model railroad site. This meant that I didn’t need to guess about scale and placement of various elements of the design. That’s actually something that frequently keeps me from even starting projects let alone finishing them. With the plans in hand I could just move forward and modify things in order to make it work better for this specific project.
What got modified? Well, that inset doorway looked like a pain in the ass to try to get right so I just made it flat across the front instead. That inset doorway seems much fancier than I’m used to seeing in photos of the period. I actually wonder if it isn’t a later addition. In any case, that went. I didn’t add in any of the interior walls. There were a few for storage in back. I figured if I decided I needed them it could be added later. One of those back rooms also had an exterior door. That became a window. I also decided not to include stairs from the porch as that would entail building terrain into the building itself and that was a whole thing I didn’t want to worry about.
I’m sort of getting ahead of myself though. Before I made any of these decisions I had to get the plans into the program and determine the size they needed to be. Importing the images was easy enough but even though I had the scale of the drawings determining what size I needed them to be was something else. I initially decided to scale them to be as close to 1/56 scale as I could get them in the program (1/56 scale being a scale that is largely used a the actual scale of 28mm minis) but then I printed out the drawing for the front of the building and put some minis that I would be using next to it to see how it looked. A bit small as it turns out. Not that small. It probably would have worked but I bumped up the size a fair amount anyway so that the minis would be able to pass through the doorway unhindered (base and all). With that decided I could move forward with the design.
With that done the next step is essentially just tracing. I used the tools within LightBurn to trace out the drawings - at least those portions I was planning to use. One thing I thought would be important to making the building look good would be the details on the facade. I didn’t want to just etch those details on to the surface of a single piece of wood. I decided that there would be a number of raised details that I would need to call out and cut in thinner stock than the walls. When you look at the final picture I think you can see that this really worked out well. There are two pieces in particular that are just small vertical pieces next to the door that have a little bit of their own etched detail that really sell the reality of the building in my mind. I did actually etch all of this detail into the walls though. It was really helpful when it came time to place and glue all of those details later.
One thing I don’t think I gave enough thought at this point was the roof. I had a vague idea about how I wanted to do it and created some triangular supports for it but I didn’t really think about it anymore until after I had cut the rest of the building. I think it’s for this reason that the roof is my least-favorite part of the construction. It works and it looks fine but I wanted a removable roof if I wanted to move minis around inside of it and the whole thing doesn’t feel as rugged as I’d like for something I’m planning to remove and replace. My next building will probably be better in this regard.
Another element that was important to consider at this point was the thickness of the material I’d be making this building out of. Although a lot of people like to use MDF for buildings, I’m becoming more fond of birch plywood. I had a few thicknesses to choose from so I decided that the walls would be 1/8” and the surface details would be 1/16”, the shingles on the roof ended up being a birch veneer held together on a sheet of cardstock. Like most of the laser cut buildings you’ve probably seen I was planning to hold things together using a tab and slot style construction - though I wanted to keep the tabs to a minimum.

With the design work done the next step was to cut out the walls. I really love working with the laser. I have a couple of 3D printers and I like working with them as well but when your 3D print comes out badly it can be super depressing know that you now have to go through the process of figuring out why the thing failed. With the laser things can certainly go wrong but the list of failure points is really small and generally pretty obvious. On this project I had one failure because my first piece of wood was more warped than I thought and the laser head touched the material just enough to shift it slightly. That’s a user error and I wouldn’t repeat it. As you can see from the photos that the final cut results were super clean.

With the walls done I went ahead and did the surface details. No problems there. Once I started putting things together I realized that I had a few pieces that were probably superfluous and didn’t end up using them (primarily on the side windows IIRC). Having etched all of the detail into the walls was super helpful at this stage.
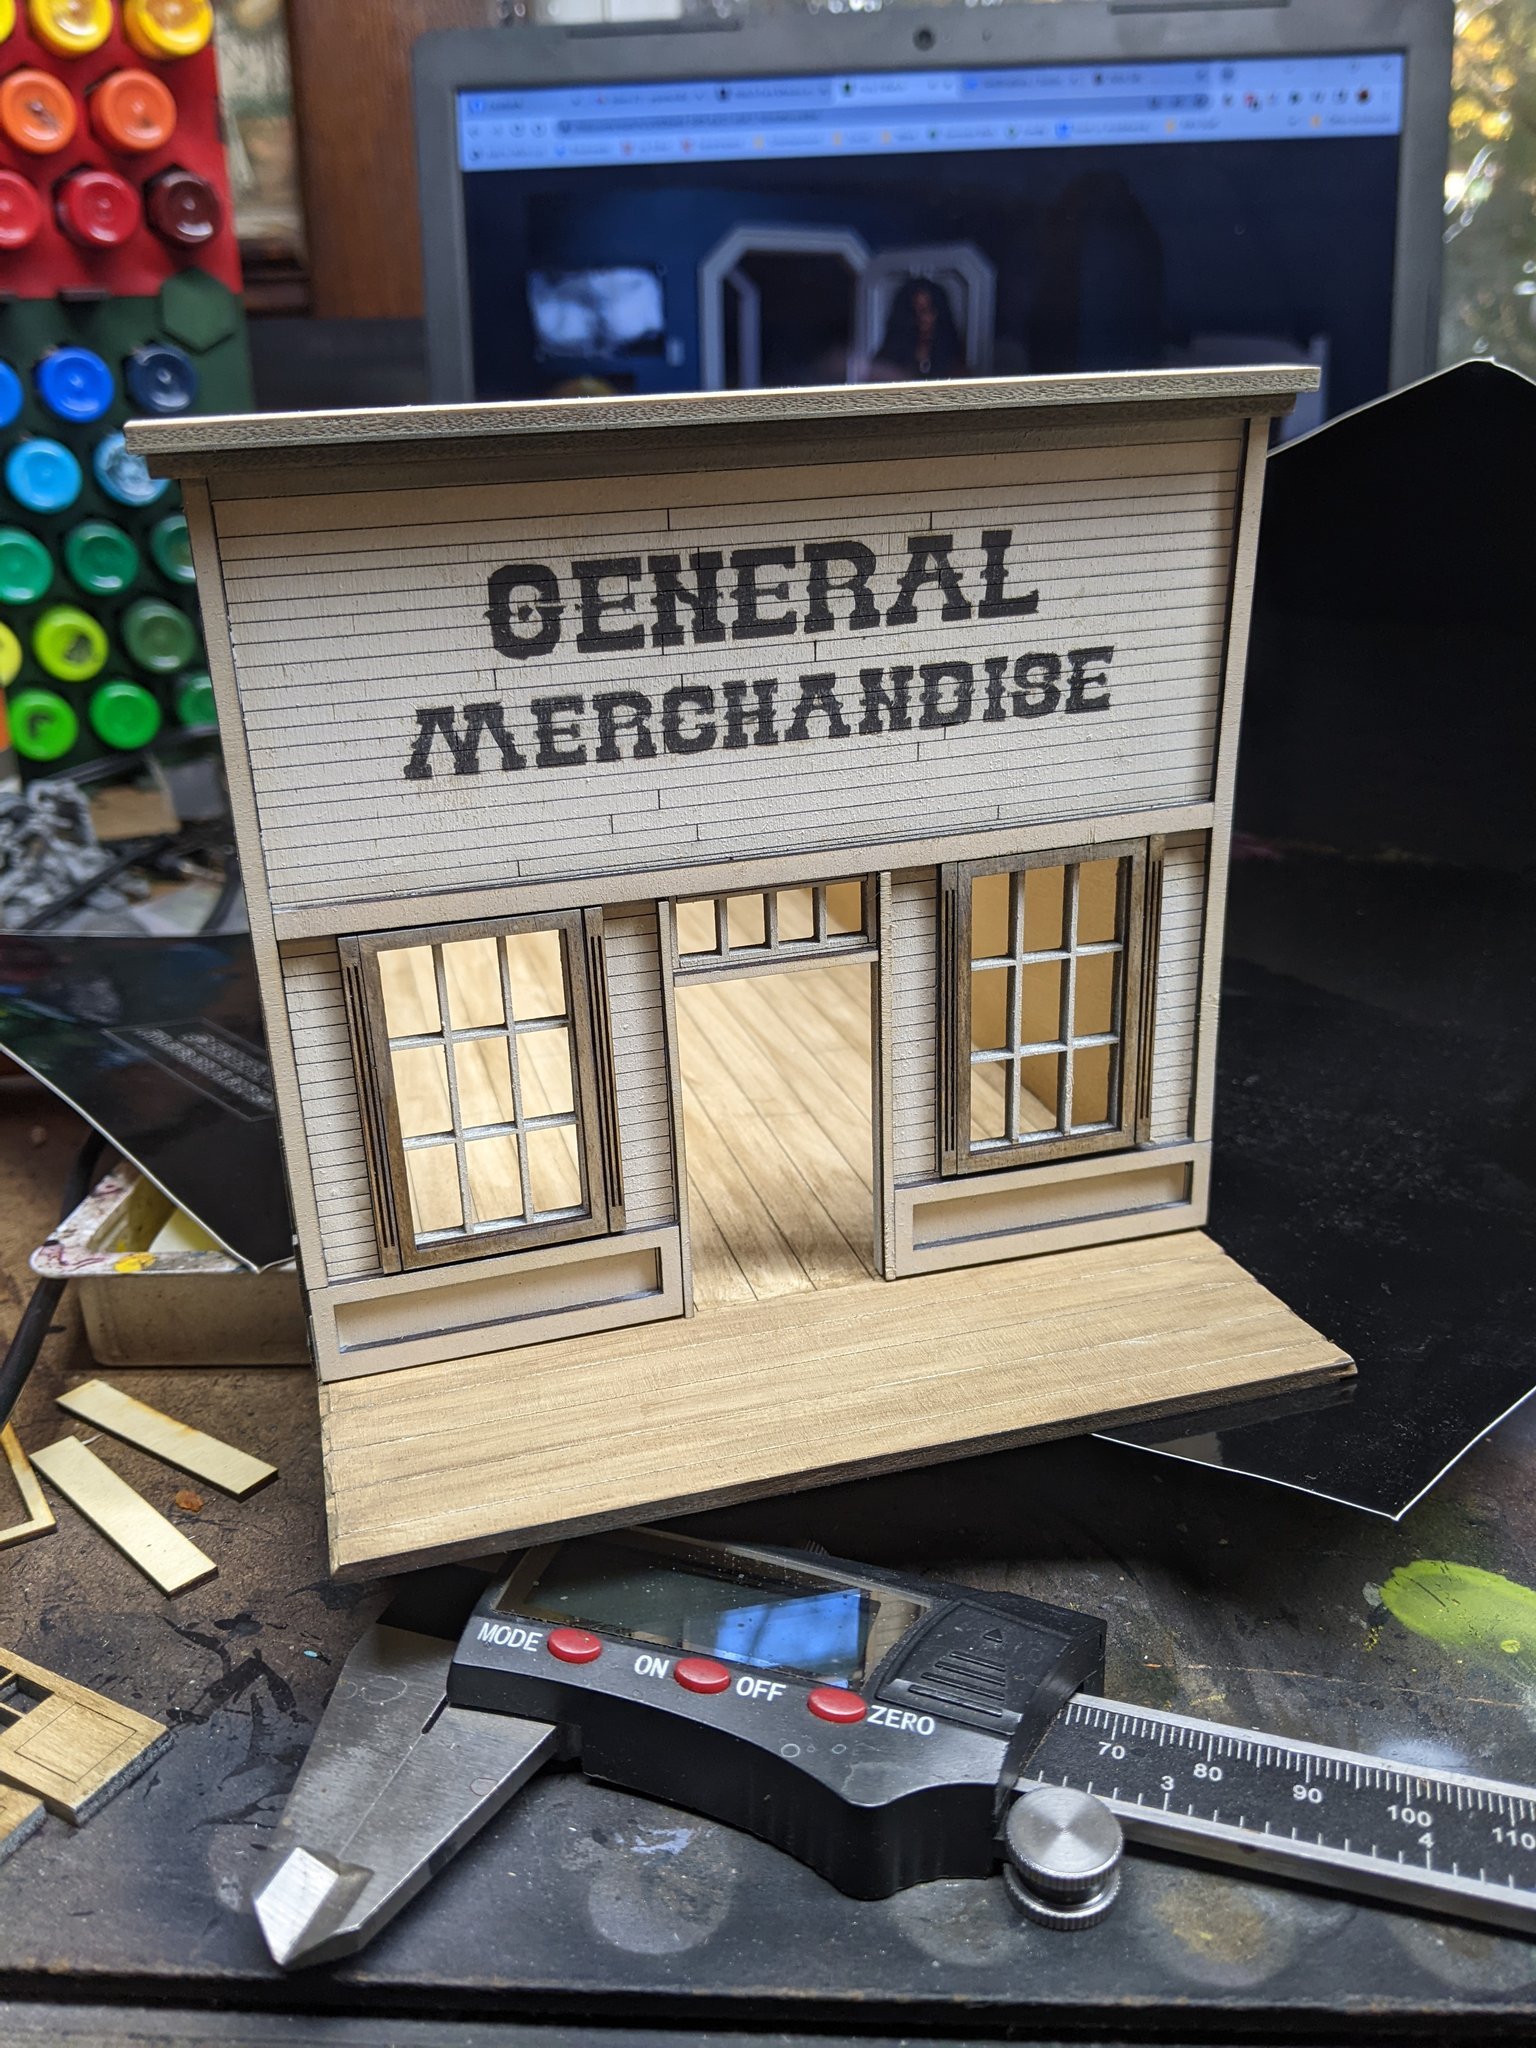
I’m not going to talk much about paint here. I did use the regular paints I generally use for minis. It was at this point I decided that I would paint the sign directly to the wall as opposed to adding a sign. I cut a stencil using laser-safe vinyl. Regular vinyl is really bad for cutting as it will release extremely toxic fumes that can hurt your lungs (and potentially kill you in large enough doses) as well as damage your laser. I could have also cut it out of masking tape if I didn’t have anything else. Just as an aside - it was the idea of stencil cutting that got me interested in getting a laser cutter in the first place.

At this point I had to figure out the roof which I really should have given more thought to. I’m not going to go into it as I’m not that happy with it but it looks fine. The veneer I used for the shingles are too thin but I’m probably the only person would would notice without me mentioning it. And, like I mentioned earlier, it’s not as sturdy as I’d like - but again that’s just me.
I’m really happy with the final look. This is also a really good jumping off point for more buildings. Future buildings will probably not be quite as long as this one (it feels like it’s going to take up a lot of table space). The basic design is really sound. I could easily repeat this with some minor changes and nobody would know it was essentially the same building. Just adding an awning would do that. I also look forward to trying to do multi-story buildings.
Commission availability for May/June
My schedule remains light for those looking to get some models painted. I do have a larger project coming in that will take up most of May but probably not all of it depending on when the models arrived. If you had a small project (1-2 minis) that you wanted to get done quickly and you got to me immediately I could probably turn them around in very short order.
That still leaves June completely open for any size project. Contact me asap.
So I bought a laser cutter/engraver...
To be fair, I bought ANOTHER laser cutter. A few years ago I got really excited about the idea of having one of these tools at my disposal and (after a ton of research to see if it was a good idea) I purchased a relatively inexpensive Chinese K-40 laser engraver.
The K-40 style laser engraver is a CO2 laser in a cheap metal housing and all of the guts to make the thing run. I spent HOURS tweaking the thing to get it to work the way I expected it to be able to work. It never seemed to have the power to cut things the way I expected based on what I was able to see others doing with the same kind of setup. Even with that in mind and keeping my expectations low it seemed that it was a lot of work to make the tool useful in any meaningful way. It turned out to be more of a hobby than a tool in much the same way it seems like some people buy cars not for transportation but to tinker with. That isn’t what I wanted. I needed a tool. So I eventually gave it away to a friend who I thought might be able to get more out of it than I did (and he has).
Cut to a couple of months ago. I think it was a YouTube video where I saw somebody demonstrating a laser cutter that did about what I expected mine to do back when I bought it but it was a super-simple design that didn’t require the large metal casing, the laser itself was tiny in comparison and look far less complex than even a simple 3D printer. Cost-wise it was far cheaper than my original K-40.
Let me jump back a second to that research that I originally did on lasers cutters (which I’m going to call them even though the term laser engraver constantly fights for supremacy). I recall now that some of my research had led me to the fact that some people had been stripping the lasers out of their CD/DVD burners and experimenting with what they could do with those. At the time I was interested in the fact that somebody was using a low power diode laser like this to cut stencils out of masking tape. The problem with those lasers is that you couldn’t do that much more with them and they seemed pretty expensive for the limited amount of power you got. It made sense, though. Those lasers could be fit inside a component of a computer where as the CO2 lasers I had seen were about 18” long and as big around as a pint glass. Of course they were going to have more power.
So, back to now. It turns out that the dead-simple, lightweight laser cutters I was seeing now were based on that lower-powered diode laser technology (which I’m not going to explain because I don’t fully understand - feel free to go look that up elsewhere). Apparently in the intervening years people have been figuring out how to make those lasers more powerful. Enough so that they are on-par in many respects with a low-end CO2 laser. Not in all respects, mind you. They have their limitations.
I think you need to see some pictures before we move forward. This is the laser that I bought.

There are three variations of this and the main difference is the laser head that is supplied. They are all otherwise identical. The cheapest of the three heads is the one that is really mostly for engraving. The laser apparently has the best resolution so if engraving was your thing that would probably be the direction you’d want to go. The other two cost the same. One is the high-power one that has a long focal length that can cut well even though thicker material. Obviously, if cutting is your thing then this is the one to go with. The third sort of bridges the gap between the two. It does nice engraving, it can cut pretty well but has a short focal length which means it’s good at cutting thinner materials. it is not the best at either function but can do both well enough. That’s the one I bought (AL2 LU2-4-SF)
So how does it work? I am inclined to use expletives to express how happy I am with this new laser. It didn’t take long to assemble, Figuring out the software didn’t take long either (more on the later maybe). And I did my first project from scratch in short order. Have a look.


With that project done I had newfound confidence to try something more useful. I knew that I wanted some counters for the game Dead Man’s Hand that were not offered by the manufacturer so I whipped up a design and tried my hand at combining cutting and engraving together in one go.

Not entirely successful but the problem here is operator error and nothing to do with the machine which operated beautifully. The problem occurred because I had the machine set up too close to the wall and so it got bumped and everything shifted slightly. The next batch will be perfect of that I am sure. Also, the counters I made are perfectly useable.
With that project under my belt I decided I needed to organize my paint. First I cut a design that I found on Thiniverse.

I don’t have a ton of Citadel paints anymore so I didn’t need too much in the way of organization. This is fine, but I don’t love it. I also considered that I might want to change the rack that I use for my dropper bottles. So I came up with this.

I call it my “paint hive” and I figure I’ll need about 5 more to replace my current PVC pipe rack. but when I’m done it will look awesome.
Then I decided to jump back to doing terrain-related stuff. First off I wanted to experiment with engraving on EPS foam and EPA foam and I ended up here.

Painted EPS foam engraving test

Unpainted EPA foam engraving test

Unpainted EPA foam engraving test
I found these experiments to be very exciting but I didn’t have anything to apply them to immediately so I went on to another terrain project. This time, Moe’s Tavern in scale with my Marvel Crisis Protocol terrain. Why? Because it would be fun.

Moe’s Tavern. The early stages

Moe’s Tavern - late stages
The project is taken from one I found the files for online. Mostly just converted from EPS and then upscaled to 1/48 scale. As I write this I still haven’t completed it - but it’s close.
This isn’t even everything that I’ve done. I’ve been keeping a file with a long list of possible projects and things I want to keep in mind for the future. The tool seems to have opened up my skull and stirred my brains in the most positive way possible. I’m constantly excited about what I can do with it and what I WILL do with it.
I’ve always been more of a model painter than a model maker and if I’m honest I think the main reason is because I kind of suck at cutting things. It’s as simple as that. I want to make a thing, I come up with a design, I start to cut parts… and it all seems to go downhill from there. Yes, I have scratch built things but I have this real hang-up with cutting things accurately which tends to stop me before I get started. This tool bypasses that hang-up entirely and hands me parts that are ready to go.
I’ve also realized that this gets me more excited to use than my 3D printers have. I’m not entirely sure why but I think that it’s because I’m never entirely sure what I’m going to get when I print something. Maybe it’ll be cool and useful, maybe not. I might need to run it again after tweaking the settings to get a better outcome and then wait hours to see if that worked. With the cutter the parts that I get are usually what I asked it to cut. If I didn’t give it enough power the first time I just run it again. If I gave it too much… the board under the work gets a little more scorched.
So here we are just under a month since I purchased this new tool and all of the above are things that I’ve accomplished with it in that time. I’m still just as excited about it today as the day it arrived and I can’t think of a better endorsement for adding this kind of tool to your shop.
Commission Availability for April
Spring is here and I find myself in the enviable position of being able to take a little time off - or I could be doing a model project for you? Go ahead and contact me right away if you’re interested in getting some work done this month. The sooner the better as I can never tell how quickly my schedule will fill.
Short wait times for new projects
This is just a quick update to share the fact that new projects that start this month won’t have to wait long to get started (and finished!).
Generally speaking, it can sometimes be months between the time you put a deposit on a painting project and the time I get started on it. Right now though the wait time is literally only a couple of weeks.
This can always change as new projects come in but if you’re reading this in the days following me writing it then you can expect the wait time to be unusually short.
Cheap paint brushes vs expensive paint brushes
For a very long time I’ve been fond of Winsor & Newton Series 7 brushes. They were first recommended to me in the 1980s and I’ve been using them ever since. There is something really wonderful about how they feel and work when laying down paint with them. The thing is, they are expensive. Very expensive. Now they are becoming more so when you can find them at all due to a US ban on the hairs used to create them. So what are the alternatives and are they also expensive?
In the past when I’ve looked for alternatives to my favorite WN7 brushes I’ve looked for brushes that purport to be the same as those brushes. Those that come closest to that ideal are every bit as expensive and since they use the same Kolinsky Sable hairs will be suffering from the same issues of availability. I’ve never found a natural hair brush that I’ve liked as much as the kolinsky sable ones. They don’t seem to last as long, don’t keep their points as well, and they never have the right snap to them. Also, they tend to almost as expensive for ones that are worth using at all.
When I first started painting I liked Winsor and Newton’s University series brushes. These are synthetic hair brushes (white!) that, when brand new, feel just about perfect to me. They keep a sharp point, they have a good snap and they feel just right when using them. They are also 1/2 to 1/3 the price of their more expensive cousins. Downside? No matter what you do their tips curl over time limiting their usefulness for things like eyes. So I would find myself replacing the brushes with some regularity. Usually trying to keep one as my detail brush and using the curled brushes as my workhorse brushes. The thing was when I discovered the WN7 brushes I realized that I didn’t need to replace them very often so while there was a higher up-front cost per brush they were cheaper over the long-term.
About two years ago I decided to experiment with some very cheap brushes. My thinking was that these were cheap enough that I could use them as “disposable” brushes for applying glue or other times I didn’t want to use a better brush. I got the “large” #1 size. The brushes were long and narrow. Almost like a liner. They seemed fine for the purposes I bought them for. Still, I decided to see what else I could use them for. They’re okay for base coating but they feel a little awkward. I think this is mainly due to the fact that I’ve been using the same brushes for so many years and these are definitely different. They work fine though. I wasn’t surprised to see that my first one curled at the tip after a handful of uses but I wasn’t ever going to use these brushes for that kind of detail so it wasn’t really an issue (quick side note: those curled tips can sometimes be useful in getting paint into hard to reach areas). What did surprise me is that I’ve continued to use these brushes and each one lasts a lot longer than I expected and now almost two years later I still have about half of the original brushes that I started with. For brushes that cost me about 40 cents each I don’t know if I could be happier with them. I was so happy with them that I created a short video about them.
With that experiment under my belt I decided to experiment again with smaller brushes that I might be able to paint eyes with. So I picked these up. Honestly, I thought I was probably throwing my money away but since it wasn’t a lot of money I was fine with it for purposes of the experiment. Once I received them I opened my first one and noticed that it had a very pronounced guide hair (that is the hair in the center of the bristles). Looking at some of the others I could see that there was some variation to the size of that hair which meant that the quality control on the brushes wasn’t great. In any case, the issue is easily dealt with by carefully trimming it down.
In use - it didn’t feel great. The bristles are a bit stiff. They weren’t great for spreading paint - but that’s not really why I bought them. The big test was painting eyes and the results were very good. Surprisingly so. Here’s a little secret: My favorite brushes haven’t ever felt great for painting eyes. The tip is so razor sharp that I feel like I need a microscope to hit my target. It’s why I liked to use pens to dot my eyes when possible. Well, these new brushes solved that problem for me. Painting the whites? Simple. Dotting the eyes? As easy as using the pens. What’s really surprising is that I’ve now used that brush over a number of minis and it hasn’t curled at all so the brush is still as useful as when I started using it. Amazing! If only half of the brushes perform as well as my first one I’ll be incredibly pleased with the results of this experiment.
As I write this post I have a third set of experimental bulk brushes on the way. I think I’m becoming addicted to them now. I’ve always loved trying out new brands of paint but never brushes. That seems to have changed now. Let me be clear, though. These are not great brushes. The handles are made of cheap wood, are sometimes a little bent and the ferrule can sometimes pop off of the handle if given the right amount of encouragement (some don’t need much encouragement). At the end of the day though the important thing I ask myself is “did they get the job done” and the answer has been “yes!” and they’ve done it on the cheap. I still keep my good brushes around but now I can save them for when I really feel like I NEED them and that means that each one will be around for a long time since I will be giving all of the grunt work (and some of the detail work) to the cheap brushes.
Videos are back!
I just realized that I’ve been basically ignoring this blog for a long time. Not just that, though. My production of videos dropped to almost nothing for a long time.
Well, I recently bought a new video camera and video production has started up again. I produced two new videos recently and another is getting close to complete. It’s almost like the old days.
If you’re interested in seeing what videos have gone up recently just click the video link above and have a look.

Marvel Crisis Protocol Dumpster
The terrain that comes with the Marvel Crisis Protocol core set continues to be some of the most fun to paint. It’s also the least work with the best results.
The number of colors and techniques used on this bin are very small.
To start, the whole thing was given a black primer coat.
Next, I used an airbrush to coat everything except for the lids with Warcolours Green 5.
The bulldog logo was picked out with Warcolours One-Coat Yellow.
Then, using a damp natural sponge, I applied Citadel XV-88 randomly across the main bin. This is the beginning of the rust coat so I wanted to make sure that I spent some extra time on corners and anything else that sticks out and is likely to get bumped and chipped.
Next, I did the same with Pro-Acryl Mahogany, following the same locations where I used the XV-88.
I went back and used the Warcolours Green 5 again. This brings the previous two colors into harmony with the base coat of the green and helps to really sell the effect.
With the sponging complete I went back to the Mahogany with a brush to pick out some of the sculpted-in dents and dings to the surface of the bin.
The lid got a dry-brush of Warcolours Warm Gray 5.
The graffiti is freehand airbrush. It is not meant to be “cool”. It’s just supposed to add a little bit of realism. The paint splotch in the corner was also done with the airbrush. The thinking is that some kid had a white spray can, started in that corner and messed up, then moved to the other corner. It’s fun to have an idea in your head as to how this stuff happens to give it some life.
A note on technique here:
The sponge was dampened to make it workable and soft but I did wring out any moisture that I could because I didn’t really want it to thin the paints I would be using. I put a drop of paint on a dry palette, put the sponge on top of it, then dabbed the sponge around the palette to both spread the paint on the sponge and keep it from being too concentrated. When applying it to the model I start very lightly to make sure that I’m not going to get a large splotch of paint. I want small chips of color. As you work it around the model it drys out and you have to use more and more pressure to get the paint on to the surface but ths also changes the look at the chips so that’s good. Eventually you stop getting anything and it’s time to re-apply or change colors.
It’s important that the paints be a bit thick and pigment dense. the XV-88 and Mahogany both fit this requirement well. If you aren’t familiar with the Pro-Acryl line of paints then you should know that I buy these specifically because of the pigment density. Great for base coats. Although the final green color isn’t really as pigment dense as the rust colors the main point of using it at the end is ro break up some of the rust colors and vary them a bit and make some of the rust look as if it hasn’t yet completely shed the paint from it.
You’ll notice the texture on the surface. At the beginning of the project I had considered adding some texture to the surface first in order to give it that look of the rust really affecting the metal of the dumpster and breaking through the paint. I decided not to and just worked with the paint. The texture occurred naturally because I was keeping the sponge dry(ish) and not applying the paint too thickly. So each of the coats of colors took quite a while to get the coverage that I was looking for. The paint at times would lift slightly with the sponge, dry, then leave a little bit of texture on the surface. With each pass with the sponge the texture would increase slightly. The end result is VERY realistically scaled. Keep in mind that this was COMPLETELY UNINTENTIONAL. It wasn’t until I got to the final green pass with the sponge that I noticed this happy accident.
Sometimes it’s possible to overthink a paint job. I’m always working on ways to make thing fast but good and I think this is a good example of that. This probably took about an hour start to finish. If I had done both at the same time (instead of saving the other for a video) it would not have taken much longer to do both.
Marvel Crisis Protocol Traffic Lights
I’ve started working on the terrain elements in the Marvel Crisis Protocol core set. I even recorded a video walking through my process for painting the traffic signal (it’s not edited yet - one thing at a time). I do have a quick video of my first example though:
One thing I wanted to point out is that both the crosswalk sign and the very tiny crosswalk instruction sign are things that I created from photos and scaled for the purpose. I’ve saved that file as a PDF so you can easily print your own. Click here to download it.
Marvel Crisis Protocol
It’s been a long time since I’ve been this excited about a game. So excited, in fact, that I took time off just so I could paint the core set and start playing. As of now I’ve finished all of the characters in the core set but I’ve only just touched on the included terrain. Here’s a look at the characters -


A new video - The Twins from HATE
I’m happy to have had another opportunity to put together a new video. This is the centerpiece model from the board game “HATE” from CMON.
The Progression of Necron 99
I did a work-in-progress thread of images on Twitter as I was working on this project and I thought I would collect them and post them here - just in case you don’t follow me there:


Pvt. Johanne the Brave
When I got my first 3D printer I always had an eye on making my own miniatures. It wasn’t until I was on my third 3D printer that this became a reality.
Meet Private Johanne. He’s a miniature that I commissioned (because I don’t have the 3D sculpting skills) to have just for fun. You could probably hide him in a guard unit without any trouble but frankly, I just wanted him for images like the one above - or maybe to put in the background of other photos of other minis. He’s really just a fun mini to have around.
Want one for yourself? Well, if you want to print it out on your own then you can head over to CGTrader and purchase him. I printed this one on my Anycubic Photon but you MIGHT be able to do something with him on a dialed-in FDM printer. People are doing some pretty amazing things with FDM printers these days.
The Plasma Pistol

I had all sorts of plans for what I thought I would do with my 3D printer when I bought it but what it seems like I've mainly done with it is to start a new hobby for myself. Sci-Fi prop gun modeling.
My latest foray into this hobby was something that I ran across on Thingiverse (which is where I get most of my gun models). The creator of this piece actually has a few 40K-related items. This is merely the latest.

What I really liked about this model is that the designer made a point to stick to the original design as seen on the models. I would not be surprised to find that he has taken all of the measurements off of one of the mini bitz and scaled it up. Of course, that's not all he did. I really appreciate the fact that he broke out a lot of the elements of the gun to be separate pieces or assemblies. So many of these models are essentially just solid blocks with all of the detail built in with creates a couple of problems. First, trying to sand a model with a lot of surface detail is a real pain and creates issues where you can easily damage that surface detail. Additionally, sometimes there are good ways to orient a piece of detail to get the best print and if all of the detail bits are baked in then you can't make the best choice on how to get the most out of those pieces. So seeing that this could come apart made life much easier for finishing.

Finishing was pretty straight forward. As usual, sanding is the biggest task. Since this was my largest 3D printing project so far I decided to use an electric vibrating sander to help speed the process along. This WAS helpful but I quickly discovered that I had to be very careful or the sandpaper would eat right through the ABS that I printed it with. I'm glad I did it, though. Doing this by hand would have taken forever.
Painting was done in assemblies. The barrels were painted flat black then polished with Rub n' Buff Pewter. The barrel shroud was actually painted with Citadel Leadbelcher and then weathered with black oil paint. The effect is strangely similar to the Rub n Buff. The lower body with painted with Warcolours Black Metallic and then weathered with a bit of drybrushed chrome. The main body was painted with a red rattlecan that I found at the hardware store (it's an amazing red and was thrill to have found it) then weathered with enamel chrome to create dings in the wear-points. The clear coil piece was painted with Warcolours Transparent Blue.
This project was done for myself, but if you find yourself in need of one please feel free to contact me. I could certainly put another one of these on the schedule. There's also enough room in it to do lighting and sound if that was something you wanted to do.


